In my last post about earthing/grounding I talked briefly about what it is and some of the benefits it offers. In this post I’d like to talk a little more about how I personally do it.
I have a few different ways that I get as much grounding as I can on a daily basis, the amount of grounding I’m currently getting is a bit different than when I actually started because when I began my own grounding we were living in Reno where….1. the weather was much better than where we are now, the PNW…..and 2. We lived 3/4 mile away from a regional park that had many miles of dirt trails where I would don my sandals and weight vest and go running for an hour or so a few times a week. Where we are now there’s also a park close by, but it’s the PNW and it’s always raining…..who the hell wants to be in the rain all the damn time?! I like to digress, so let me redirect myself.

Originally I made my own pair of earthing sandals with an old motorcycle tire, copper rivets, and leather laces, but I found those to be a bit heavy and clunky. Next I took an old pair of Sanuk flip flops, removed the straps and added a pair of laces that I bought from Earthrunners. I used some leather punches to get holes in the proper place on the sandals and I was ready to roll, or run. The way Earthrunners facilitate the grounding of your body is with their laces. A silver strand runs the length of the lace which is fastened to the copper rivet with a washer, and the lace comes up through the bottom of the sandal in between your first and second toe. So basically every time that copper rivet touches the ground your getting the grouding effect.
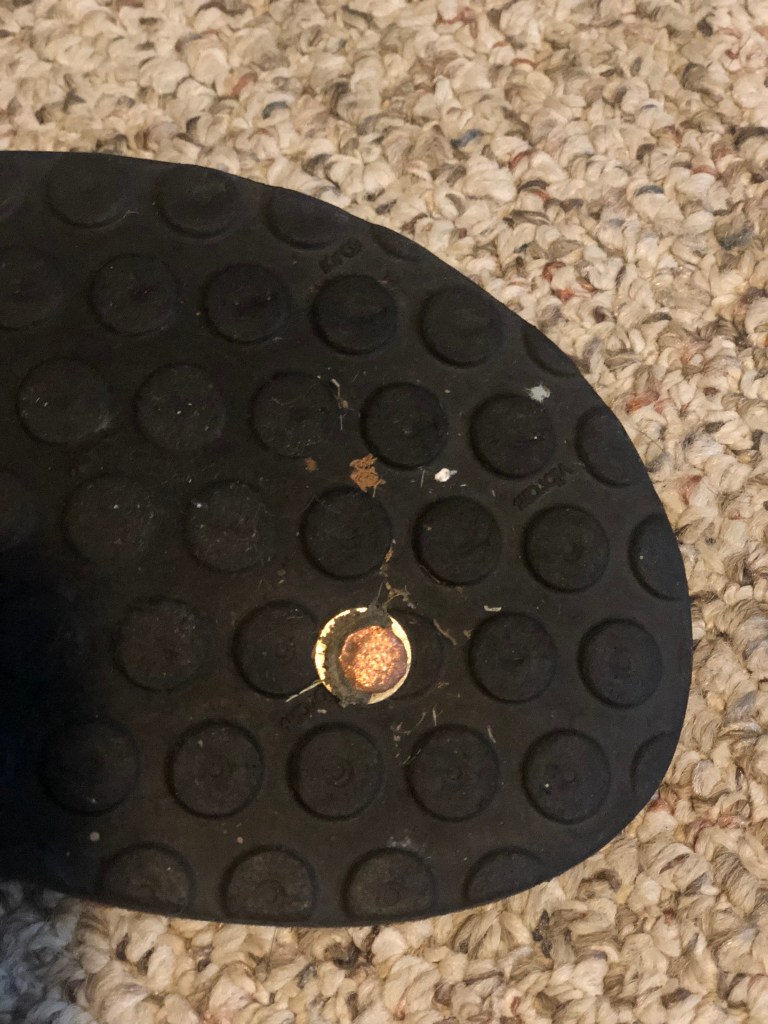
The only problem I’ve run into with these laces is that eventually the copper rivet wears out and if you’re unlucky, as I was on top of a volcano in El Salvador last year, the copper rivet will be lost and the lace with come through the washer and the top of the sandal rendering them useless. I’ve had that happen far from home two times and that’s where walking barefoot can come in handy if your feet are a little tough and can handle rocks, dirt, or whatever you may be walking on. I’ve resorted to carrying an extra pair of the laces with me whenever I’m wearing the sandals while on a run or a hike in the event of a flat tire.
Because I haven’t been getting outside barefoot as much up here in the PNW, I finally decided to ground my bed. I had been wanting to do this for quite a while and finally last week got around to doing it. I bought some copper foil tape, grounding stake, and copper wire. Next what I did was run a strip of the copper tape down the length and around the ends of my side of the bed and connected the copper wire to one side. In case you don’t know, our bedroom is on the second story of our house, so I had to run the wire from the head of the bed, through the screen, and down to the ground where I connected the wire to the grounding stake and stuck it in the ground.
VOILA!!!!! My bed is now grounded. One thing to consider is the amount of fabric and the insulating factors of that fabric between you and the tape. The strip of tape I lay on is directly underneath my sheet and the only place I can even feel the tape is at my feet, but the more nights it’s been on the bed, it seems like the softer the tape has become and I barely notice it at all. It’s worth noting that only my side of the bed is grounded because Kelli, as suspected, didn’t want to be laying on top of any tape she might feel when she’s sleeping. We shall see if she changes her mind or not.

Grounding stake outside of and about 12 feet down to the ground. 
Wire coming through the screen 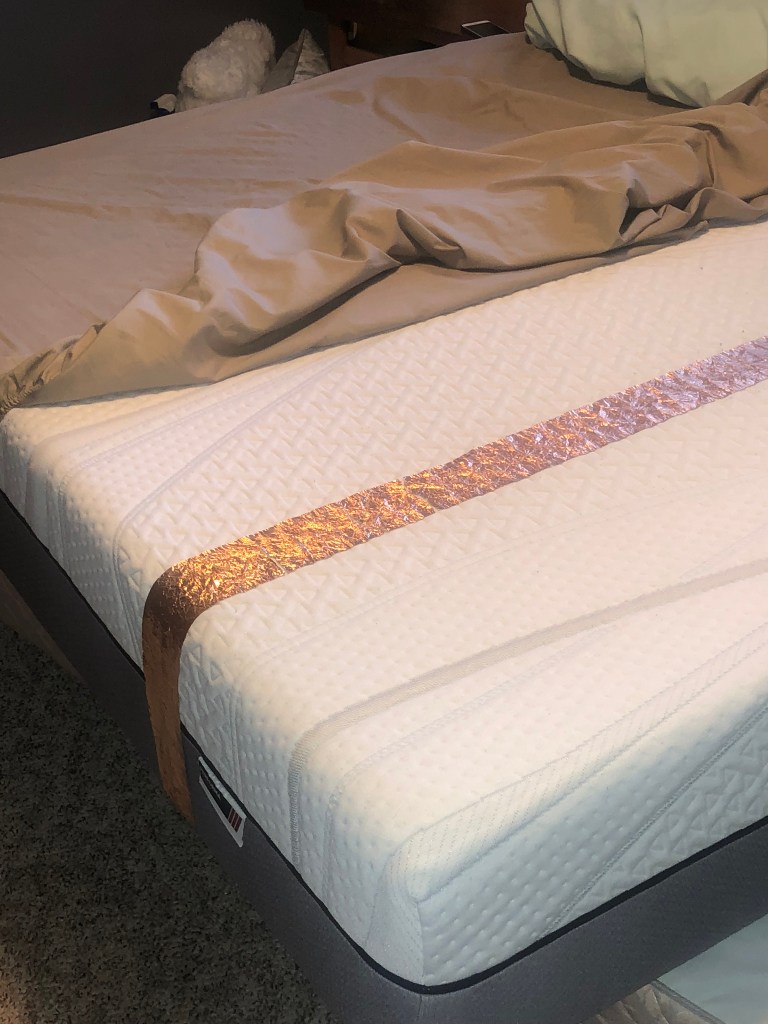
Foot of the bed 
Head of the bed with copper wire coiled and taped between two layers of tape.
Ideally, I’d like to check the effectiveness of the grounding with a voltmeter, but I don’t currently have mine with me, so I guess I’m just hoping, for now, that it’s working.
How’s your earthing/grounding journey going?
P.S. This post is was put out about 10 days after I grounded the bed. Word to the wise, don’t use the copper foil tape method. More about that soon.
